How to Animate Text and Layers in Your Browser Without After Effects
Keyframe animation is the core skill in motion design. If you know how keyframes work, you can animate almost anything. After Effects built its entire workflow around the concept. So did BrwsrFx.
This guide walks through keyframe animation in BrwsrFx from scratch: what keyframes are, how the timeline works, and how to build your first animated composition without installing anything or paying for a subscription.
What a Keyframe Actually Is
A keyframe marks the value of a property at a specific point in time. Set a keyframe at 0 seconds with your text layer at the left edge of the frame. Set another keyframe at 1 second with the text layer centred. The compositor fills in the movement between the two points automatically. That interpolation is animation.
Every animatable property works the same way: position, scale, rotation, opacity. Set two keyframes with different values and something moves. Set ten keyframes and you have a sequence.
This is identical to how After Effects handles keyframes. If you have any AE background, the mental model carries over directly.
The BrwsrFx Timeline
Open BrwsrFx and create a new composition. The timeline runs along the bottom of the editor. Each layer you add appears as a horizontal track. The playhead is the vertical line you drag to scrub through time.
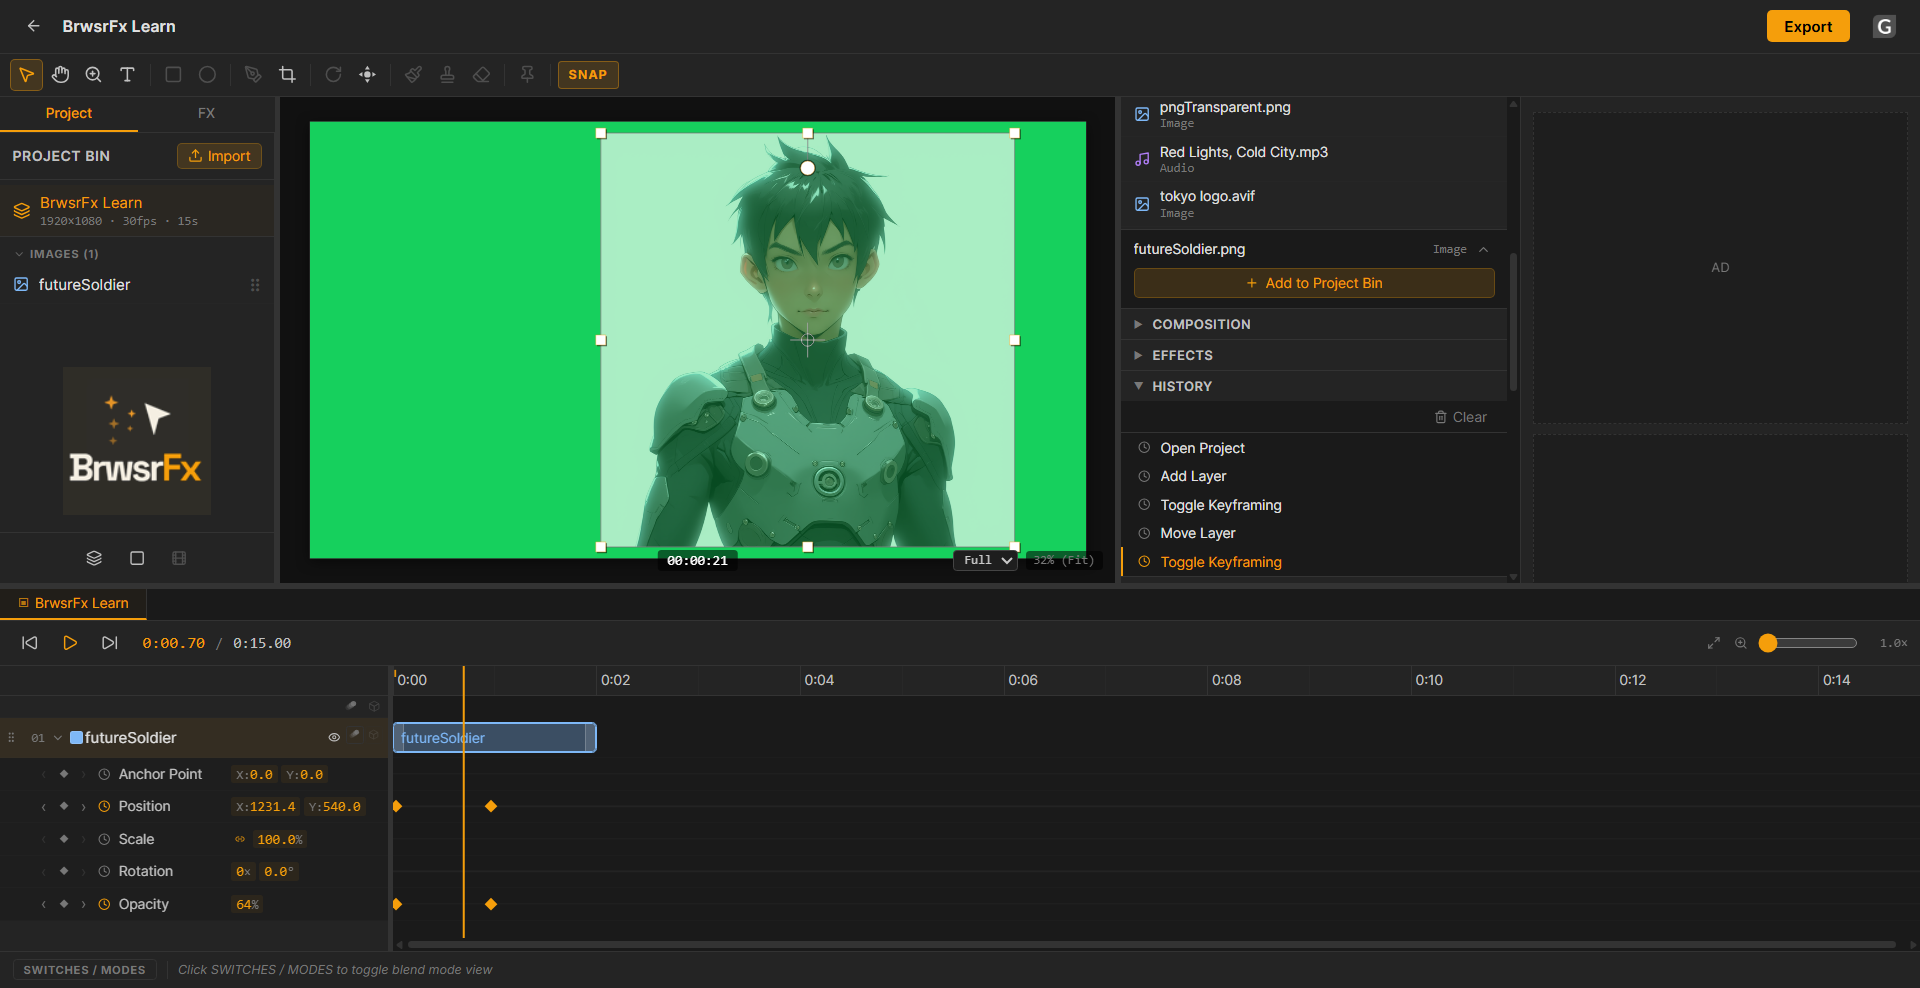
The BrwsrFx timeline with a layer expanded showing keyframe tracks.
To reveal keyframe tracks for a layer, select the layer and expand it in the timeline panel. You will see individual tracks for position, scale, rotation, and opacity, the four core animatable properties on every layer.
The workflow from here is:
- Move the playhead to your start point
- Set a keyframe on the property you want to animate
- Move the playhead to your end point
- Change the property value
BrwsrFx creates the second keyframe automatically when you change the value. The animation is live as soon as you move the playhead.
Animating a Text Layer Step by Step
Here is a complete example: a text layer that fades in and slides up from the bottom of the frame.
Step 1: Add a text layer
Click Add Layer and select Text. Type your text, set your font and size in the properties panel.
Step 2: Position the layer off-screen
Move the playhead to 0 seconds. In the properties panel, drag the Y position value downward until the text is below the bottom of the composition frame. Set a keyframe on Position.
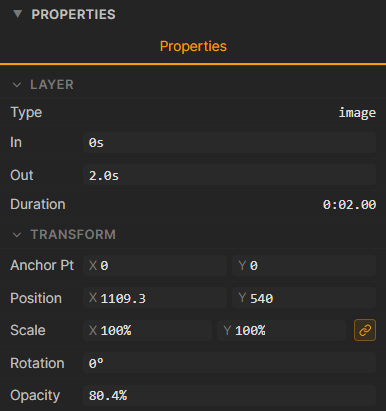
Setting a position keyframe at 0 seconds with the layer off-screen.
Step 3: Set the end position
Move the playhead to 0:15 (15 frames in, half a second at 30fps). Drag the text layer to where you want it to land in the frame. BrwsrFx sets a second Position keyframe automatically.
Step 4: Add the fade
Move back to 0 seconds. Set Opacity to 0 and set a keyframe. Move to 0:15. Set Opacity to 100. The layer now fades in as it rises.
Playhead sitting between keyframes. Position and Opacity tracks both animating.
Step 5: Adjust easing
Right-click any keyframe diamond in the timeline to open the easing menu. Easing is set on the departing keyframe. It controls the animation leaving that keyframe toward the next one, not arriving at it. Set Ease In/Out on your first keyframes to give the animation a natural feel instead of mechanical linear movement.
Animating Multiple Layers Together
Real compositions stack multiple animated layers. The approach is the same for each layer, but timing relationships between layers are where compositions get interesting.
A common pattern: animate a background shape in first, hold for a beat, then bring the text in on top. In BrwsrFx, this means offsetting the keyframes on the text layer slightly later in the timeline than the shape layer.
Null layers are useful here. Add a null layer, parent your text and shape layers to it, and you can animate the entire group together by keyframing the null. Position the null off-screen, animate it into frame, and all parented layers move with it.
Easing Reference
Easing is set on the departing keyframe and controls the segment leaving it toward the next one. The final keyframe in a sequence has no effect.
| Easing | Effect |
|---|---|
| Linear | Constant speed, mechanical feel |
| Ease In | Starts slow, accelerates toward the next keyframe |
| Ease Out | Starts fast, decelerates into the next keyframe, most natural for settling into a final position |
| Ease In/Out | Slow start, fast middle, slow finish, most polished overall |
Exporting Your Animation
When your composition is ready, click Export in the top bar. BrwsrFx renders to H.264 MP4 at 1080p using FFmpeg running entirely in your browser. No upload, no queue, no watermark. The file downloads directly to your machine when rendering is complete.
For a 10-second composition, rendering typically takes 15 to 30 seconds depending on layer count and effects.
No Install. No Subscription.
BrwsrFx runs at brwsrfx.vercel.app. The editor opens immediately, no sign-in needed. Everything in this guide is available on the free tier. No download, no Creative Cloud account.
Free. Ad-supported. With your support, it stays that way.